Configure Tenant
Services as Code
  • Introduction
  • Services as Code (SaC)
  • CXTM Basics
  • CXTM Projects
  • CXTM Test Cases
  • CXTM Test Automation
  • CXTM Batches
  • Setup GitLab CI/CD
  • Configure L3Out
  • Test Results
  • CXTM Reporting
  • Continue your Education

Tenant Configuration Files

Portions of the baseline configuration of the ACI fabric have been pre-configured for you. In this section, you will only create the configurations required at a tenant level. You will leverage VS Code Server to create the configuration files. The configuration files will be created in the data directory of the GitLab repository.

Step 1 - Navigate to VS Code Server

The VS Code Server is a web-based IDE that provides a development environment for the lab.

  1. Click on the link below to access the VS Code Server.


  2. Enter the password below into the VS Code Server login.
    • Password: c1sco123


  3. Your landing page should look similar to the below screen capture.


  4. Press Ctrl + Shift + ` (tilde) to open a new terminal window in VS Code Server

Step 2 - Clone the GitLab repository

  1. Clone the SaC user repository using the Clone with SSH option.
  2. Copy and paste the below command in the VS Code Server terminal window to start the cloning process.

  3. 
    git clone git@gitlab.sac-caf-07.svsrtpdmz.cisco.com:CiscoLive/SaC-CAIT-Lab.git
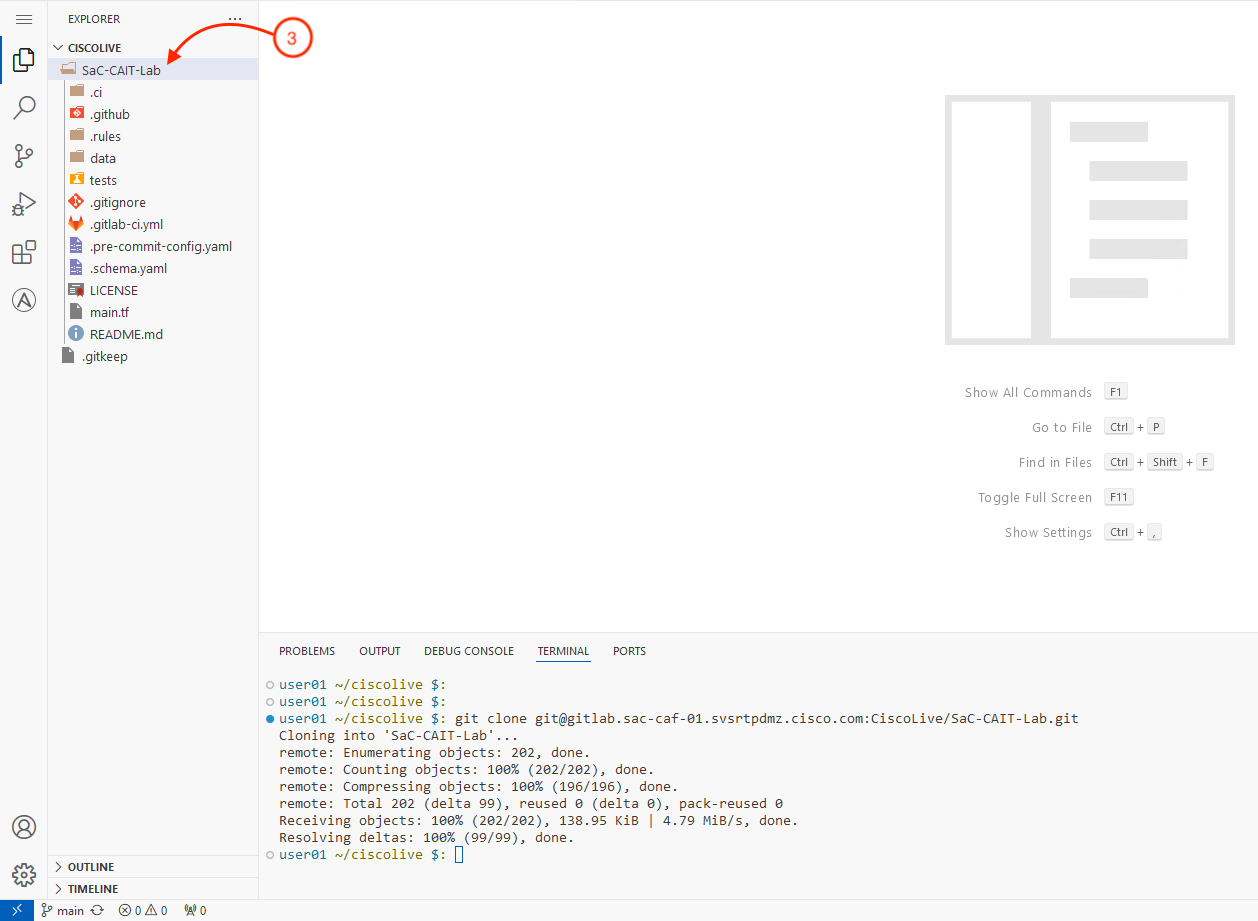
    
    
  4. Upon successfull cloning of the repository, the files from the repository will be visible and accessible from the VS Code Server. Click on the SaC-CAIT-Lab folder to view the cloned files.


  5. Change directory to the repository SaC-CAIT-Lab folder.

  6. 
    cd SaC-CAIT-Lab


Step 3 - Create access_policies.nac.yaml

You will create the access_policies.nac.yaml file in the data directory. This file will define the physical and routed domains, VLAN pools, AAEPs, interface policies, and interface profiles for the leaf switches in the ACI fabric.

  1. Copy and paste the below command in the VS Code Server terminal window to create the access_policies.nac.yaml file in the data directory.

  2. 
    code-server -r data/access_policies.nac.yaml


  3. Copy the following code into your newly created access_policies.nac.yaml file.

  4. 
    ---
    
    apic:
      access_policies:
        aaeps:
            - name: pod07-physdom-aaep
              physical_domains:
                - pod07-physdom
            - name: pod07-l3out-aaep
              routed_domains:
                - pod07-l3outdom
        physical_domains:
          - name: pod07-physdom
            vlan_pool: pod07-static-vlan-pool1
        routed_domains:
          - name: pod07-l3outdom
            vlan_pool: pod07-static-vlan-pool2
        vlan_pools:
          - name: pod07-static-vlan-pool1
            description: pod07-static-vlan-pool1
            allocation: static
            ranges:
              - from: 1107
                role: external
          - name: pod07-static-vlan-pool2
            description: pod07-static-vlan-pool2
            allocation: static
            ranges:
              - from: 4007
                to: 4007
                role: external
        leaf_interface_policy_groups:
          - name: pod07-l3out-polgrp
            type: access
            link_level_policy: system-link-level-10G-auto
            cdp_policy: system-cdp-enabled
            lldp_policy: system-lldp-enabled
            aaep: pod07-l3out-aaep
          - name: pod07-vpc-polgrp
            type: vpc
            link_level_policy: system-link-level-10G-auto
            cdp_policy: system-cdp-enabled
            lldp_policy: system-lldp-enabled
            port_channel_policy: system-lacp-active
            aaep: pod07-physdom-aaep
        leaf_interface_profiles:
          - name: pod07-l3out-intprof
            selectors:
              - name: pod07-l3out-selectors
                policy_group: pod07-l3out-polgrp
                port_blocks:
                  - name: eth1_13-14
                    from_port: 13
                    to_port: 14
          - name: pod07-vpc-intprof
            selectors:
              - name: pod07-vpc-selectors
                policy_group: pod07-vpc-polgrp
                port_blocks:
                  - name: eth1_27
                    from_port: 27
        leaf_switch_profiles:
          - name: pod07-L1201
            selectors:
              - name: L1201
                node_blocks:
                  - name: L1201
                    from: 1201
            interface_profiles:
              - pod07-l3out-intprof
          - name: pod07-L1202
            selectors:
              - name: L1202
                node_blocks:
                  - name: L1202
                    from: 1202
            interface_profiles:
              - pod07-l3out-intprof
          - name: pod07-L1203
            selectors:
              - name: L1203
                node_blocks:
                  - name: L1203
                    from: 1203
            interface_profiles:
              - pod07-vpc-intprof
          - name: pod07-L1204
            selectors:
              - name: L1204
                node_blocks:
                  - name: L1204
                    from: 1204
            interface_profiles:
              - pod07-vpc-intprof


  5. Press Ctrl + s to save the access_policies.nac.yaml file.
  6. Warning

    Be sure to save your file! Not saving will result in your code not executing.

Step 4 - Create tenant.nac.yaml

Next, you will create a second configuration file, tenant.nac.yaml, in the data directory. This file will define the tenant, VRF, bridge domain, application profile, endpoint group, contracts, and filters for the ACI fabric.

  1. Copy and paste the below command in the VS Code Server terminal window to create the tenant.nac.yaml file in the data directory.

  2. 
    code-server -r data/tenant.nac.yaml
    
    
  3. Copy the following code into your tenant.nac.yaml file.

  4. 
    ---
    
    apic:
      tenants:
        - name: pod07
          description: pod07-tenant
          vrfs:
            - name: pod07-vrf1
              description: pod07-vrf1
              data_plane_learning: true
              enforcement_direction: ingress
              enforcement_preference: enforced
              preferred_group: false
          bridge_domains:
            - name: pod07-bd1
              vrf: pod07-vrf1
              mac: 00:22:BD:F8:19:FF
              arp_flooding: true
              advertise_host_routes: false
              ip_dataplane_learning: false
              clear_remote_mac_entries: false
              limit_ip_learn_to_subnets: true
              ep_move_detection: false
              multi_destination_flooding: bd-flood
              unknown_unicast: proxy
              unknown_ipv4_multicast: flood
              unknown_ipv6_multicast: flood
              l3_multicast: false
              unicast_routing: true
              subnets:
                - ip: 10.1.107.1/24
                  description: pod07-subnet1
                  primary_ip: true
                  public: true
                  private: false
                  shared: false
                  virtual: false
                  igmp_querier: false
                  nd_ra_prefix: true
                  no_default_gateway: false
          application_profiles:
            - name: pod07-ap1
              description: pod07-ap1
              endpoint_groups:
                - name: pod07-epg1
                  bridge_domain: pod07-bd1
                  physical_domains:
                    - pod07-physdom
                  static_ports:
                    - node_id: 1203
                      node2_id: 1204
                      channel: pod07-vpc-polgrp
                      port: 27
                      vlan: 1107
                      mode: regular
                      deployment_immediacy: lazy
                  contracts:
                    providers:
                      - pod07-contract1
          contracts:
              - name: pod07-contract1
                description: pod07-contract1
                scope: global
                subjects:
                  - name: pod07-subject1
                    description: pod07-subject1
                    filters:
                      - filter: pod07-filter1
                        action: permit
                        priority: default
                        log: true
                        no_stats: false
          filters:
            - name: pod07-filter1
              entries:
                - name: any
                  ethertype: unspecified
                  protocol: unspecified
                  source_from_port: unspecified
                  destination_from_port: unspecified
                  stateful: false


  5. Press Ctrl + s to save the tenant.nac.yaml file.
  6. Warning

    Be sure to save your file! Not saving will result in your code not executing.

Step 5 - Apply tenant configuration

Next, you will commit and push the configuration files from local to the remote repository in GitLab. This will trigger the pipeline to apply the tenant configuration changes to the ACI fabric.

  1. Perform a git add of the files created. Copy and paste the below command in the VS Code Server terminal window to add the files.

  2. 
    git add data/access_policies.nac.yaml data/tenant.nac.yaml
    
    
  3. Next, perform a git commit of the files to the repository. Copy and paste the below command in the VS Code Server terminal window to commit the files.

  4. 
    git commit -am "Added tenant configuration files"
    
    
  5. Finally, perform a git push of the files to the remote repository. This will automatically trigger the pipeline to apply the configuration changes to the ACI fabric. Copy and paste the below command in the VS Code Server terminal window to push the files.

  6. 
    git push


    Step 6 - Review the GitLab pipeline execution

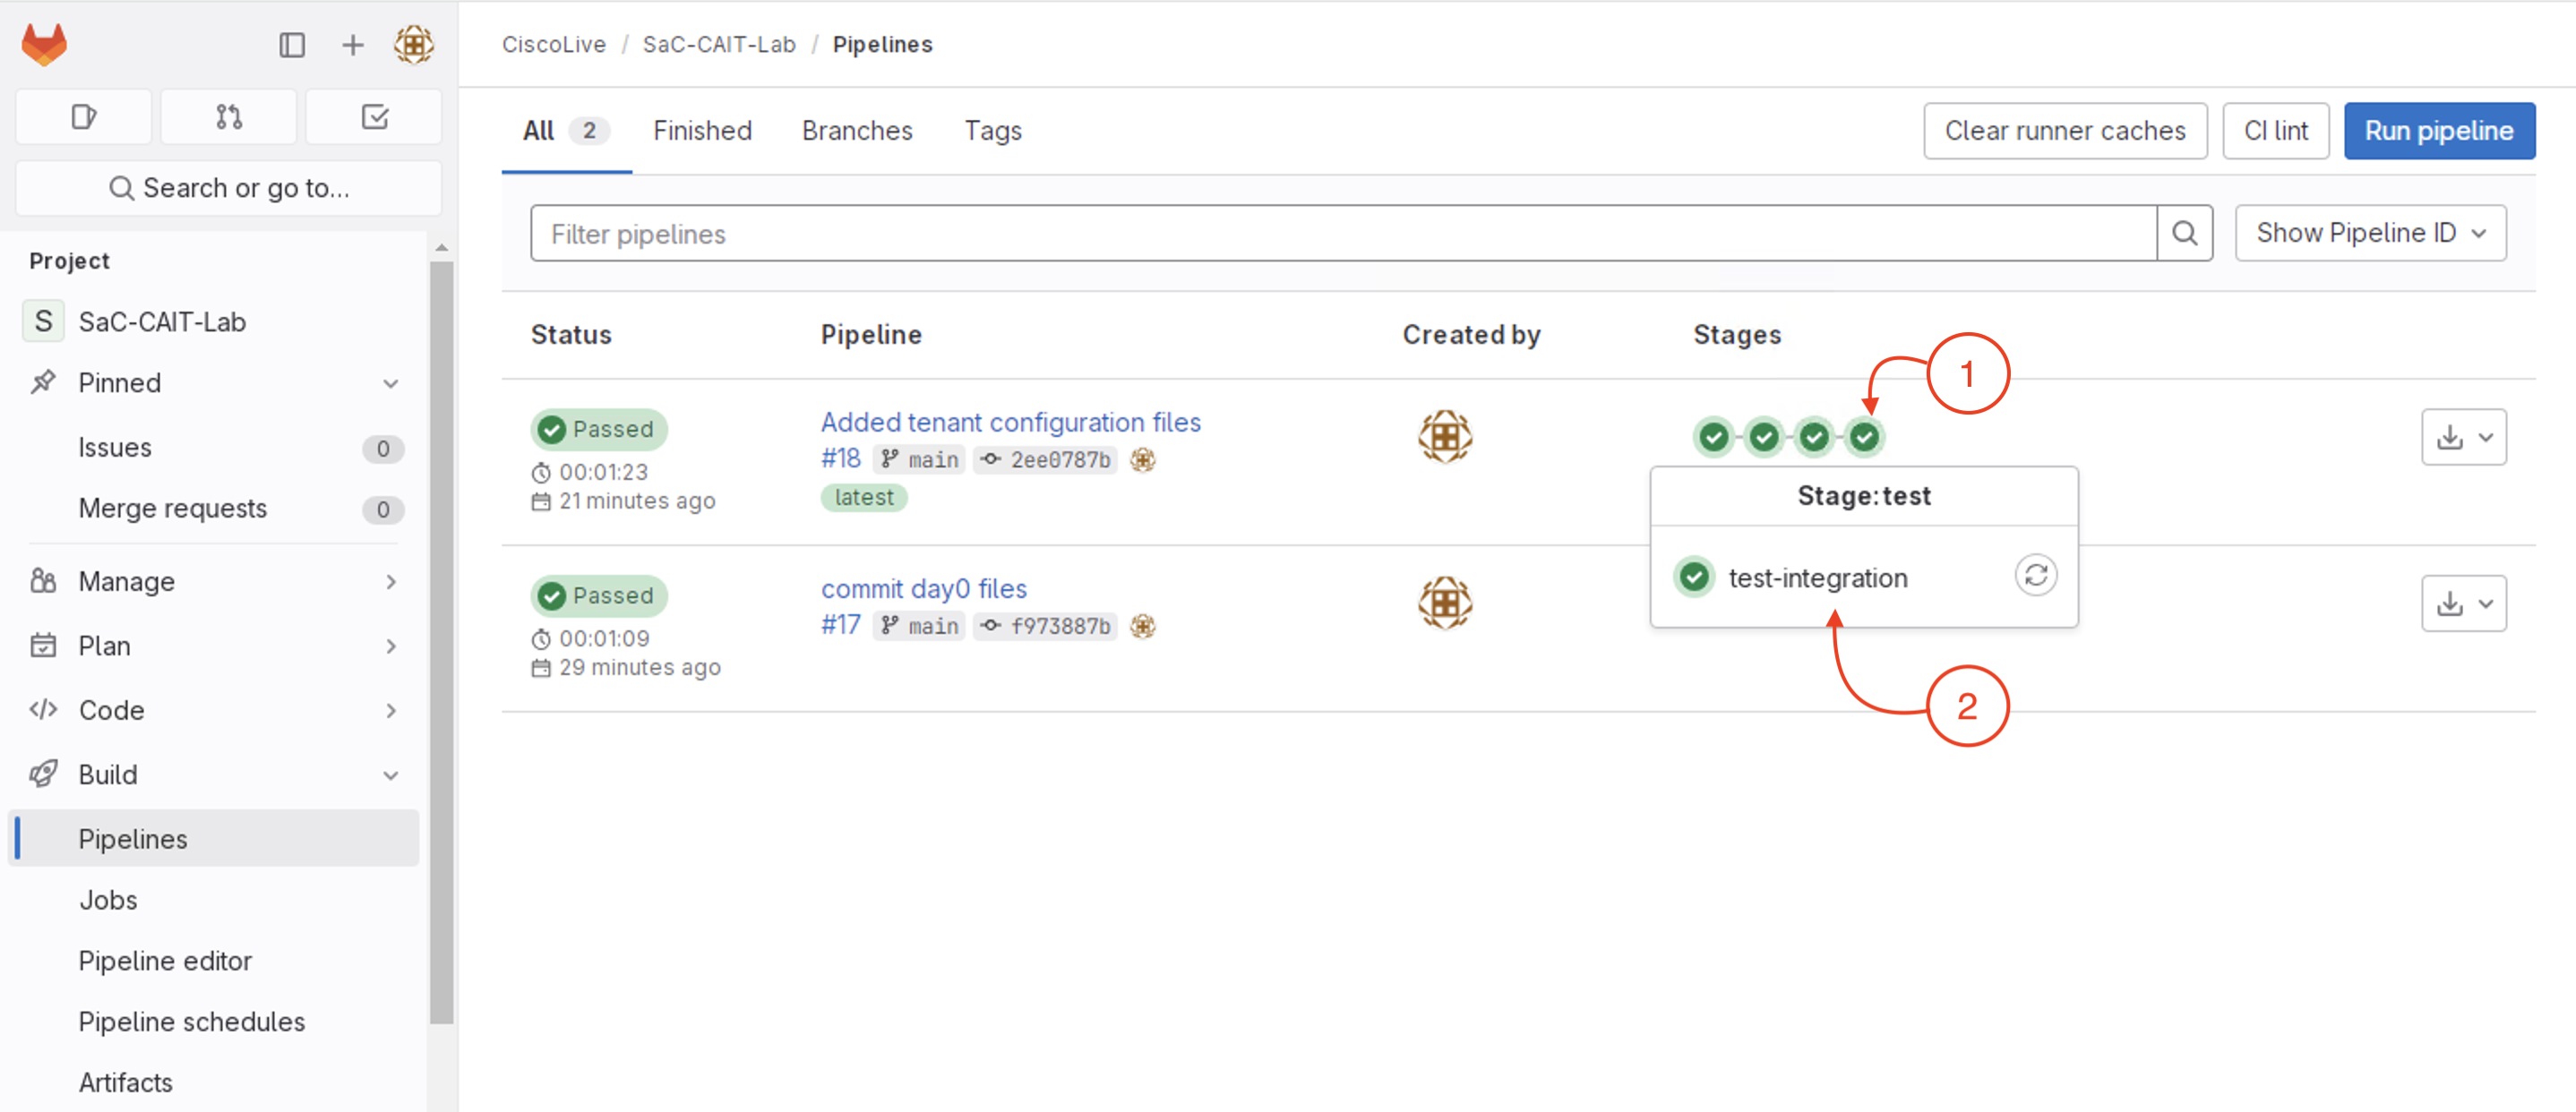
    The pipeline should successfully execute all the four stages after the git push.

    1. Navigate back to your GitLab server


    2. Click on Build
    3. Click on Pipelines to view the pipeline execution


    Warning

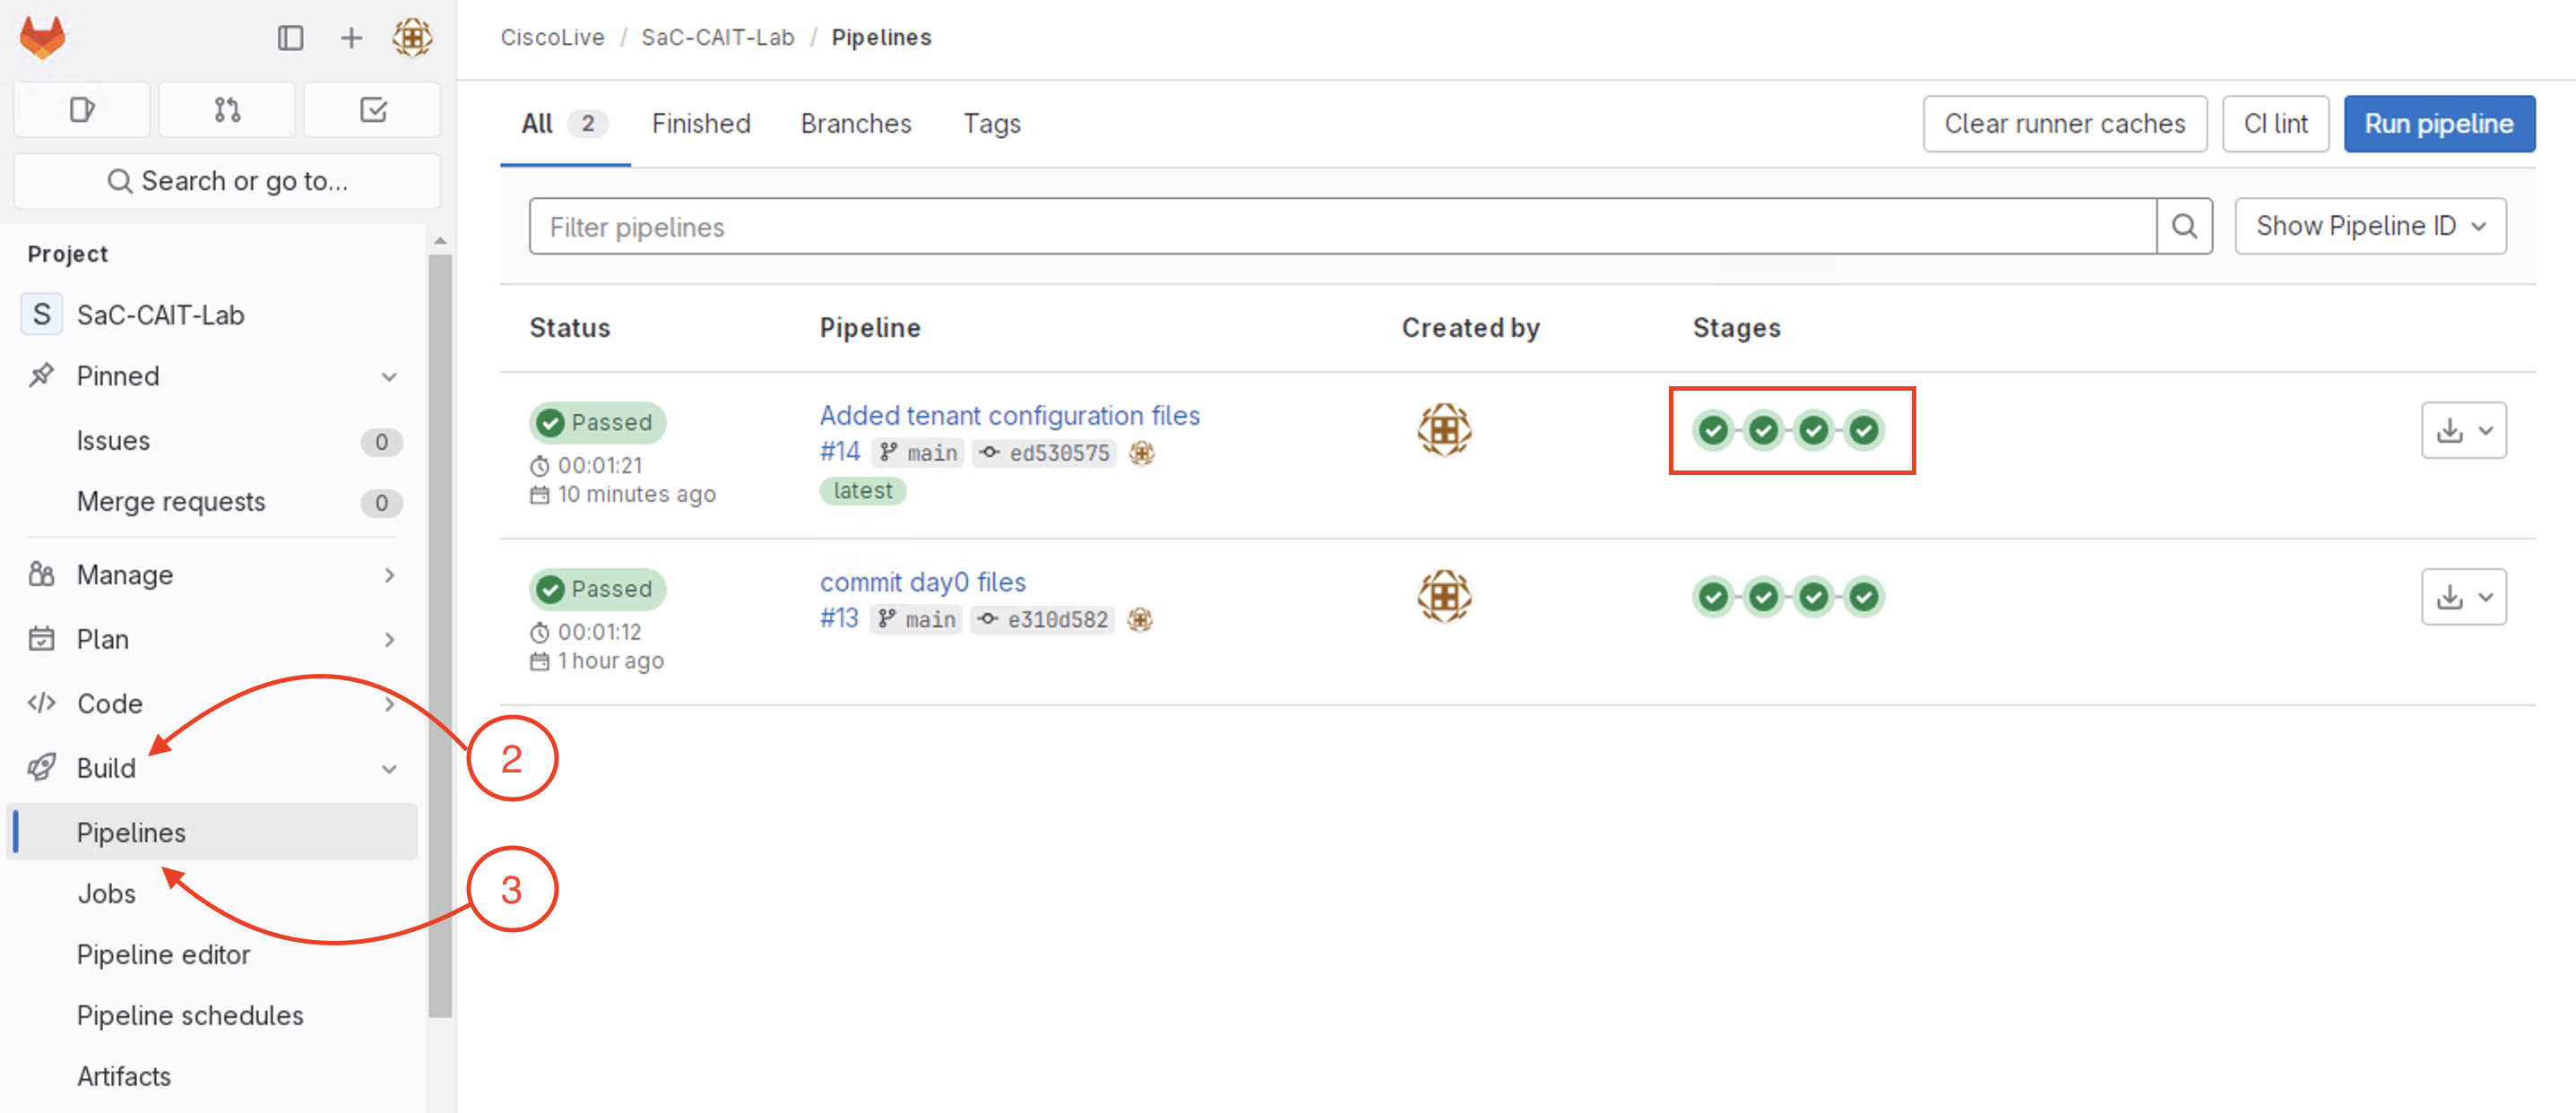
    If for any reason the pipeline is failing, please check with your proctor before moving to the next step

    Step 7 - Review the APIC for tenant configuration

    With the successfull completion of the pipeline execution, the tenant configuration should be applied to the ACI fabric.

    1. Login back to the APIC and navigate to Tenants > ALL TENANTS to view your tenant " pod07. "
    2. Double click on your tenant " pod07 " to view additional details of the tenant configuration.

    Step 8 - Review test-integration pipeline stage

    Review the test-integration stage of the pipeline and associated test case results.
    1. Click on the Stage:test of the pipeline.
    2. Then, click on the test-integration step asscoaited with the stage.


    3. Review the test stage logs by scrolling upwards on the log window to view the test cases executed and the result summary.


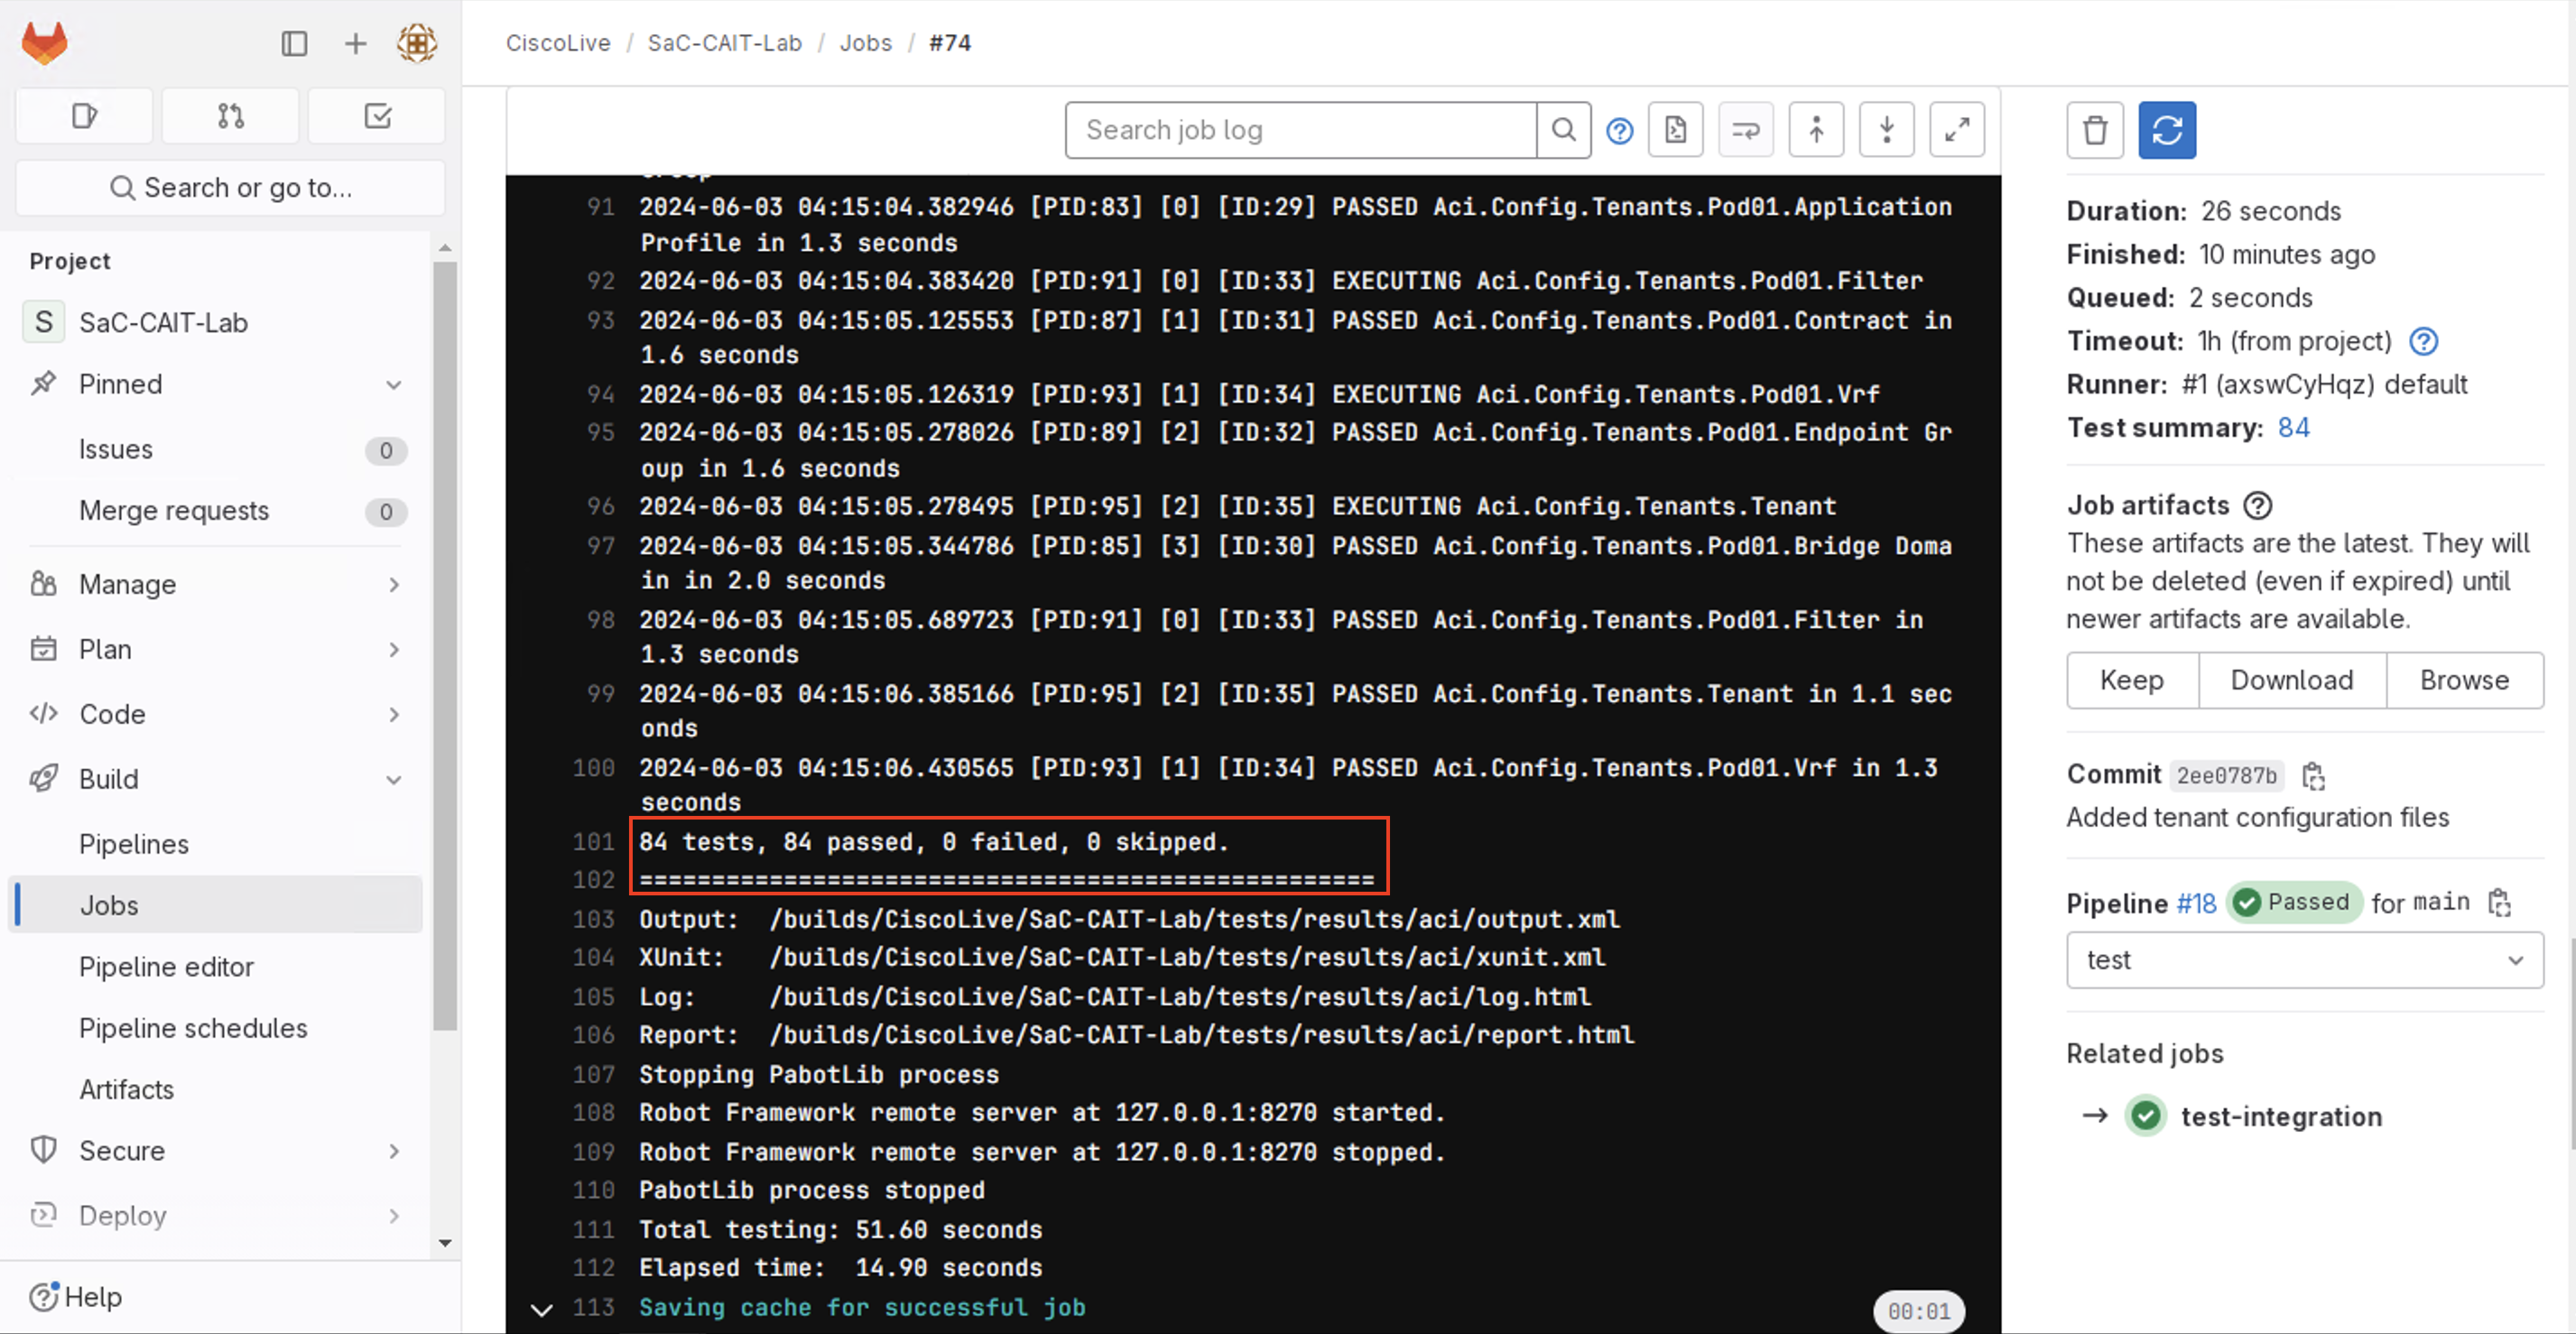
    4. The test cases executed in this stage are all configuration verification tests. The appropriate tests are picked up and executed automaticaly in this stage with the input available from the configurations YAML files in the data directory.


      Continue to the next section to develop additional test case through CXTM Test Automation Manager (CXTM).